

Hypnotized by Chickens - Video
Weekend Project - Temperature Light and Fan Controller

After doing a little research I decided this too will become a DIY project! There is no soldering required however this is a little more technical than my usual construction projects. If you are into building electronics and are in need of a good 110VAC temperature controller then this is a fun and easy project. Also, this temp. controller could be used with a fan to cool when it starts to get too hot. If you are not so handy with electronics and are in need of a device like this, then feel free to contact me.
So lets get started. First I will admit, this is not the cheapest project and probably could have been done for even less money if I used a plain single-gang box with a couple cables and wire nuts, however, if something's worth doing, it's worth doing right...
The Parts:
| # | Part | Source | Qty. |
| 110V AC Temp. Controller Module | Ebay (earlybirdsavings) | 1 | |
| HM243-ND | Project Box - ABS | Digi-Key | 1 |
| Q209-ND | AC Receptacle | Digi-Key | 1 |
| Q227-ND | Power Outlet | Digi-Key | 1 |
| 401-1307-ND | Rocker Switch - Lighted | Digi-Key | 1 |
| WM6897CT-ND | .187 Quick Connector | Digi-Key | 6 |
| A27824CT-ND | .25 Quick Connector | Digi-Key | 3 |
| 5292 | 6' 14AWG Power Cable | Monoprice.com | 1 |
SAFETY NOTICE!
This project involves high voltage electricity and can be extremely dangerous, please use caution! Double and triple check all of your connections before applying power. Never plug your project into the wall with the box open. Unplug immediately if there is any smoke or popping sounds.
|

|
 The Controller |
| The first thing to do is cut the openings in the project box for all of the different components. Using a Dremel or similar tool is highly recommended since the plastic is thick and using a blade can be dangerous. If you do not have a Dremel or rotary tool then a series of holes made with a drill and bit in combination with an x-acto blade should do the trick. (Careful not to cut yourself!) | 
|
| On the front panel (the taller side) I cut a rectangle and square for the controller module and the AC Outlet. On the right side, towards the center I drilled a hole with a notch towards the front for the illuminated switch. Around the other side I drilled a small hole just big enough for the temperature probe to go through. You could buy a rubber gromite for this but since I was unsing this one for myself I just put some silicon on the inside instead. | |

|
 As you can see, the cuts do not have to be perfect, mine are not. |
| Next I took the small orange brackets off the control module and started fitting the switch, AC Outlet and AC Inlet. It took a little tweaking with razor to get all of the components to fit, you want to start out a little small and shave a bit to get a nice snug fit. If you find the hole you cut is a bit too large then try to silicon the component from the inside so it doesn't move around. You will want to wait on installing the control module until you have added all of the wires - since you will not be able to afterwards. | |

|
 I've found if the button is too snug it will not switch easily if at all - place it and test. |
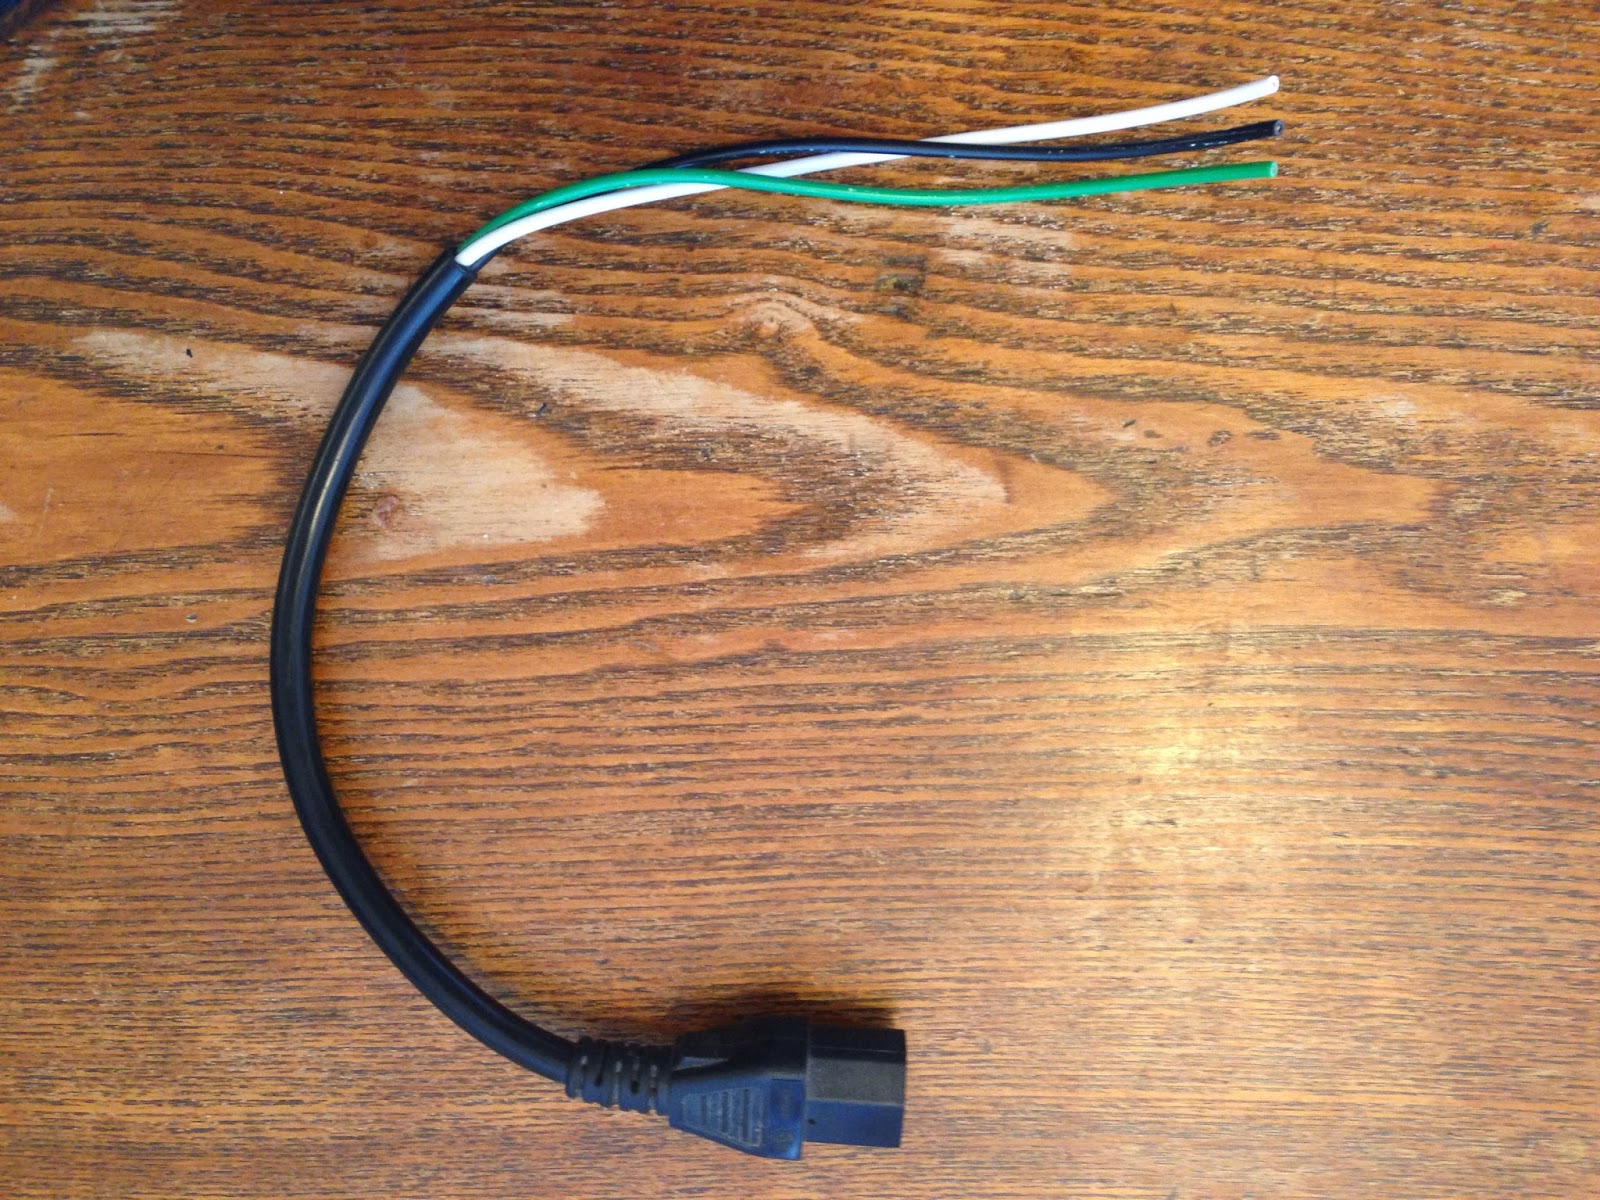
| For the wire inside the controller I used pieces from an old computer cable I cut in a different project. Strip the black jacket and you have nice stranded copper cable that is easy to work with and rated for high voltage. I started by eyeballing lengths and cutting/stripping the wires that will attach to the control module (not the green ground wire). | |
|

|
| Next I wired the controller, you can see the power is jumped from the input to the switch and the other side of the switch will go out to the AC Outlet. Once it is all wired, the cover can be screwed back on and the module can be installed into the project box. after inserting the module into the box about half way, install the orange tabs so it can be locked into place. | |

|
 You can see all of the components are in place and ready to be wired. |
| Since I used quick connectors for the plugs and switches, there is no soldering required, just crimping (Make sure to use a proper connector crimp tool so you do not have loose connections). Depending on the gauge of wire used, it can be difficult to insert two cables into one connector so plan accordingly, if all else fails, use a wire nut. Since I already installed all of the components into the box and space is tight - I used needle nose pliers to slide the connectors onto the tabs, starting with the lowest connections first and working my way up. | |

|
 Take your time and make sure every connection is correct as you work your way up. It is best to use properly color coded cable for easy identification. |

|
 The green ground wire just passes from the input to the output since the module does not require a ground |
| After carefully checking over your connections it is finally time to screw the bottom on and plug it in! If all was properly connected you should be ready to set the temperature and slew following the lovely instructions provided with the module (note a bit of sarcasm) and you are ready to install the temperature controller in your brooder or coop! Hope you enjoyed this project, I sure did! I am currently working on detailed plans including a wiring diagram that I will be selling for $1 - Stay Tuned! | |

|

|
Egg Song
So I am doing dishes and hear this loud squawk/honk sound coming from the coop. So naturally I run out there to see what's the matter, thinking that I would come up to a grisly scene of feathers and blood - only to find the hens sitting perfectly fine. Not a scratch or a peck any where. HMMM...
Turns out it was an egg song, how lovely! I was bale to capture an egg song the other day and I though I would share.
As you can see, she does her honking and then goes under the ramp to lay. For what ever reason, Ethel likes to lay under the ramp into the coop even though we have 7 perfectly good nesting boxes. Go figure!
What I have learned about broody hens
Through the last 3 to 4 months I have been observing my broody hens and I thought I would share my personal experience with them. Maybe someone else that is finding themselves in the same situation would get some insight as to what might happen. This is my first rodeo, so I am by no means an expert on the topic of broody hens, however I can share my experiences and observations. If this is at least the littlest bit helpful to anyone out there then I am more then happy.
First off the signs.
My two Ameraucanas were never the friendliest, they would always run if you tried to pick them up. They were never aggressive or defensive in any way. Never would peck or bite any bird or human, just sort of skittish. So it was a real surprise when I went to collect the eggs one morning and Joan bit me! I pulled my hand out and tried to come from a different angle, only to have her take a big chomp right on my finger. She didn't break the skin or anything, but it hurt and it was totally out of character. She puffed out her feathers and spread her wings out trying to make herself look bigger and hide the eggs from me.
I also noticed that both Joan and Ethel would not come out of the nesting boxes when I threw scratch out into the run. In fact they stayed in the nesting boxes if there were eggs there or not. I only saw them come out for about 15 minutes once a day, to eat and drink.
Both of the hens were also very vocal, always making noises and clucking, when they were usually pretty quiet. This is also a sign of broodiness, as you can hear in the above video.
They were both really warm. I thought that maybe they were sick and had a fever.
So I had two birds that were warm, not eating, more aggressive, and loosing weight from the lack of eating. After a search on some message boards I figured out that they were broody! They had all the classic signs.
I read that broody hens will also pull out their breast feathers to make a soft nest for the eggs, ours did not do this.
Now, we know what we have - What to do about it?
I read about a few methods to break the broodiness, which is actually a chemical reaction inside the birds. Sort of like when an animal goes into heat. They get these hormones that kick in and they are compelled to sit on eggs until they hatch. I read about getting a wire cage and putting them in it and suspending it from the ground so that they get air flow under them and the drop in temperature would eventually break them of their broodiness. I also read about cold baths. Dunking the birds in cold water up to their vents to bring their temp down and that would break them. I also read that it could take up to three weeks of doing this before they would get over it. Ain't nobody got time fo' that!
I also read that you can just let them sit on eggs, but they will remain broody until after the chicks hatch, and sometimes longer. One person recounted that her broody hen mothered the chicks until they were pullets bigger then her!

We opted to let them hatch.
So we bought 12 fertilized eggs from the same place that we bought the hens and put some under one, and some under the other. Only to come back later to find Ethel abandoned her clutch and was trying to share Joan's with her. So we moved all 12 into one box and let both of them sit on the eggs. We candled the eggs and pulled out a couple of duds. A few ended up not hatching and one got eaten by the Bard (Jessica) so we started with 12 eggs and got 6 chicks, which is about par for the course from what I understand.
When hatch day came, we were very pleased to find that both Ethel and Joan were caring for the baby chicks, and were not fighting at all (which was something that can happen as well) they both worked as a team caring for the babies and were very protective. They also got stressed out and fretted and fussed over the babies. So typical mother behavior!
 |
| Puffing up their feathers and holding their wings out to appear bigger and hide the clutch underneath them. |
First off the signs.
My two Ameraucanas were never the friendliest, they would always run if you tried to pick them up. They were never aggressive or defensive in any way. Never would peck or bite any bird or human, just sort of skittish. So it was a real surprise when I went to collect the eggs one morning and Joan bit me! I pulled my hand out and tried to come from a different angle, only to have her take a big chomp right on my finger. She didn't break the skin or anything, but it hurt and it was totally out of character. She puffed out her feathers and spread her wings out trying to make herself look bigger and hide the eggs from me.
 |
| The clutch of fertilized eggs |
I also noticed that both Joan and Ethel would not come out of the nesting boxes when I threw scratch out into the run. In fact they stayed in the nesting boxes if there were eggs there or not. I only saw them come out for about 15 minutes once a day, to eat and drink.
Both of the hens were also very vocal, always making noises and clucking, when they were usually pretty quiet. This is also a sign of broodiness, as you can hear in the above video.
They were both really warm. I thought that maybe they were sick and had a fever.
So I had two birds that were warm, not eating, more aggressive, and loosing weight from the lack of eating. After a search on some message boards I figured out that they were broody! They had all the classic signs.
I read that broody hens will also pull out their breast feathers to make a soft nest for the eggs, ours did not do this.
Now, we know what we have - What to do about it?
I read about a few methods to break the broodiness, which is actually a chemical reaction inside the birds. Sort of like when an animal goes into heat. They get these hormones that kick in and they are compelled to sit on eggs until they hatch. I read about getting a wire cage and putting them in it and suspending it from the ground so that they get air flow under them and the drop in temperature would eventually break them of their broodiness. I also read about cold baths. Dunking the birds in cold water up to their vents to bring their temp down and that would break them. I also read that it could take up to three weeks of doing this before they would get over it. Ain't nobody got time fo' that!
I also read that you can just let them sit on eggs, but they will remain broody until after the chicks hatch, and sometimes longer. One person recounted that her broody hen mothered the chicks until they were pullets bigger then her!
We opted to let them hatch.
So we bought 12 fertilized eggs from the same place that we bought the hens and put some under one, and some under the other. Only to come back later to find Ethel abandoned her clutch and was trying to share Joan's with her. So we moved all 12 into one box and let both of them sit on the eggs. We candled the eggs and pulled out a couple of duds. A few ended up not hatching and one got eaten by the Bard (Jessica) so we started with 12 eggs and got 6 chicks, which is about par for the course from what I understand.
When hatch day came, we were very pleased to find that both Ethel and Joan were caring for the baby chicks, and were not fighting at all (which was something that can happen as well) they both worked as a team caring for the babies and were very protective. They also got stressed out and fretted and fussed over the babies. So typical mother behavior!
 |
| cheep cheep! |
 |
| Happy moms co-parenting those chicks |
 |
| Happy hens and happy chicks |
Quail Coop Construction - Part Two
With a little help from our feline friend Princess Buttercup I continued on with the quail coop project...

| The Coop (or Pen) is 24" tall at the lowest point which is more than enough head space for quail so to try and gain some floor space I decided to add a shelf or 'second floor' half way up and about 12" deep and across the length of the back. I used some heavy 7-ply I found on a job and 2x2s for support legs. |  |
| Bear with me as I jump around during this build, I guess that's how my brain works... Next I added the 1/2" mesh to the doors I built. After hanging one door with two hinges I realized I needed to add stops in the frame so the door doesn't swing in too far. |  |
 |  |
| Next I removed the doors so I can paint them easily and continued with adding 1/2" hardware cloth on the sections of the coop that are going to be open. |
 |
| I decided to keep the sides closed in with some plywood to protect the quail from too much of a draft in the cool months. For this I used more of the 7-ply and a couple sanded 1x2s for the edge. |
 |
|
Here is another view from the side, I added another 1x2 trim piece to the front where the OSB divider is. Next I need to add some paint, roof panels, a watering system, dust bath and Quail!! |
 |
Part 3 Coming Soon!!
Back to Part One
Tomato Hornworms in the Vegetable Garden
| Today I noticed the tomato plants were being eaten by something, after looking a little closer I found 2 large tomato hornworms. They are actually really cool looking - if it wasn't for them devouring our tomato plants I would not want to get rid of them. If I were to let them live and eat our plants they will eventually turn into a Gray Hawk Moth, an equally creepy looking - giant moth. | 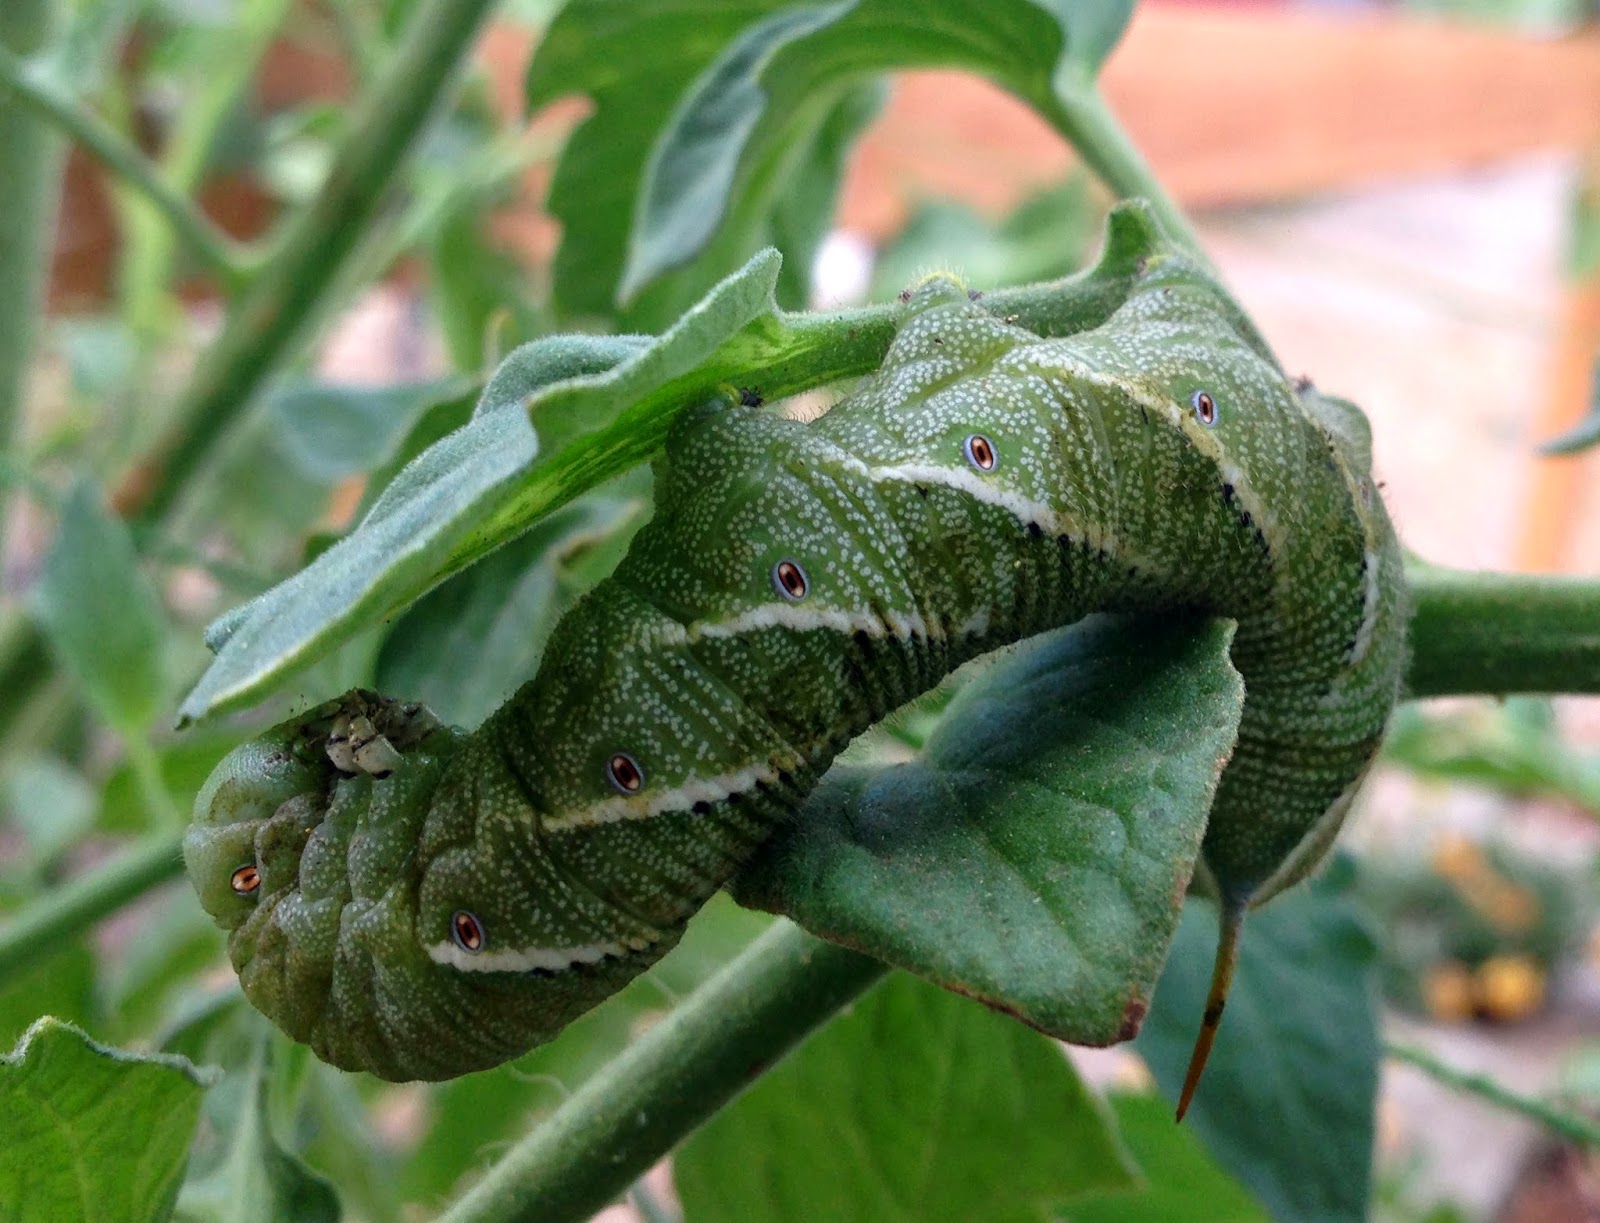 |
| Looking really close it looks like they have tiny eyes along their side, I'm not sure but I think these may be the spiracles? | 
|
 Creepy and awesome! |

|
Chicks learning how to be chickens
The mama hens are starting to teach the babies how to chicken! They have been making quite a mess and ruckus in the process - but it is so cute!
We got 12 fertilized eggs and this is the end result - 6 chicks! We had a hard time trying to figure out if they are hens or cockerels when they were a day old, but I think some are girls. We will know for sure in about 5 more weeks!
We plan to buy 6 more baby chicks and tossing them (Not literally!) into the mix in hopes that the mamas take them in as well.
Thanks for watching!
Popular Posts
-
 Hello! So as with most of the things for our micro-farm we decided to build our own brooder box for the Jumbo Coturnix Quail rather than ...
 -
 Through the last 3 to 4 months I have been observing my broody hens and I thought I would share my personal experience with them. Maybe som...
 -
 Today I noticed the tomato plants were being eaten by something, after looking a little closer I found 2 large tomato hornworms. They are...
 -
 With a little help from our feline friend Princess Buttercup I continued on with the quail coop project... I framed a divider in the...
 -
 This weekend I was at the local hardware store early in the morning and was able to get some discounted lumber for Really cheap and most o...
 -
So I am doing dishes and hear this loud squawk/honk sound coming from the coop. So naturally I run out there to see what's the matter, ...
-
 After installing almost all of the OSB and the main double doors I made the large nesting box door/lid. I started with only two hinges but e...
 -
 After a visit to a neighboring farm, the inspiration came to raise quails! They are much smaller then your backyard chicken, but are compar...
 -
 One of my favorite things to do in the yard is watch the chickens do their thing - it is hypnotizing and calming. Sometimes when I am stres...
 -
 Here is a quick rundown on how we built the chicken coop - from the ground up. We took several pictures during construction, I will attempt...
